menambahkan disk pada virtual server centos logical volume di VMWare Vsphere
tulisan ini sebagai catatan pekerjaan agar tidak lupa dan sebagai Portofolio, kali aja ada yang lirik 😀
- harus login dulu ke dashboard Vspere nya.
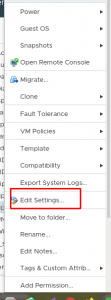
- kemudian, pilih VM yang akan di extend disknya, dan klik kanan, dan pilih edit setting.
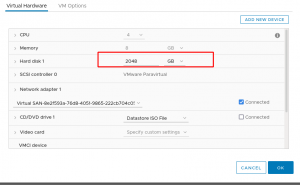
lalu kamu bisa edit jumlah disknya mau jadi berapa. setalh itu , klik Oke.
5. lanjut, SSH ke CentOS servernya. ketik fdisk -l untuk mengetahui diskname dan apakah disk sudah tertambah
[root@localhost /]# fdisk -l

Disk /dev/sda: 2199.0 GB, 2199023255552 bytes, 4294967296 sectors
Units = sectors of 1 * 512 = 512 bytes
Sector size (logical/physical): 512 bytes / 512 bytes
I/O size (minimum/optimal): 512 bytes / 512 bytes
Disk label type: dos
Disk identifier: 0x0009a189

 Device Boot Start End Blocks Id System
/dev/sda1 * 2048 2099199 1048576 83 Linux
/dev/sda2 2099200 419430399 208665600 8e Linux LVM

Disk /dev/mapper/centos-root: 53.7 GB, 53687091200 bytes, 104857600 sectors
Units = sectors of 1 * 512 = 512 bytes
Sector size (logical/physical): 512 bytes / 512 bytes
I/O size (minimum/optimal): 512 bytes / 512 bytes


Disk /dev/mapper/centos-swap: 8455 MB, 8455716864 bytes, 16515072 sectors
Units = sectors of 1 * 512 = 512 bytes
Sector size (logical/physical): 512 bytes / 512 bytes
I/O size (minimum/optimal): 512 bytes / 512 bytes


Disk /dev/mapper/centos-home: 151.5 GB, 151523426304 bytes, 295944192 sectors
Units = sectors of 1 * 512 = 512 bytes
Sector size (logical/physical): 512 bytes / 512 bytes
I/O size (minimum/optimal): 512 bytes / 512 bytes
oke, sudah tertambah ya jadi 2 TB. lanjut ketik fdisk /dev/sda dan seperti langkah2 dibawah ini
[root@localhost /]# fdisk /dev/sda

WARNING: The size of this disk is 2.2 TB (2199023255552 bytes).
DOS partition table format can not be used on drives for volumes
larger than (2199023255040 bytes) for 512-byte sectors. Use parted(1) and GUID
partition table format (GPT).

Welcome to fdisk (util-linux 2.23.2).

Changes will remain in memory only, until you decide to write them.
Be careful before using the write command.


Command (m for help): p

Disk /dev/sda: 2199.0 GB, 2199023255552 bytes, 4294967296 sectors
Units = sectors of 1 * 512 = 512 bytes
Sector size (logical/physical): 512 bytes / 512 bytes
I/O size (minimum/optimal): 512 bytes / 512 bytes
Disk label type: dos
Disk identifier: 0x0009a189

 Device Boot Start End Blocks Id System
/dev/sda1 * 2048 2099199 1048576 83 Linux
/dev/sda2 2099200 419430399 208665600 8e Linux LVM

Command (m for help): n
Partition type:
 p primary (2 primary, 0 extended, 2 free)
 e extended
Select (default p): p
Partition number (3,4, default 3): 3
First sector (419430400-4294967295, default 419430400): 419430400
Last sector, +sectors or +size{K,M,G} (419430400-4294967294, default 4294967294): 4294967294
Partition 3 of type Linux and of size 1,8 TiB is set

Command (m for help): w
The partition table has been altered!

Calling ioctl() to re-read partition table.

WARNING: Re-reading the partition table failed with error 16: Device or resource busy.
The kernel still uses the old table. The new table will be used at
the next reboot or after you run partprobe(8) or kpartx(8)
Syncing disks.
kamu bisa reboot VM nya, atau ketik partprobe , saya pilih reboot saja biar hackul yakin.
kemudian ketik vgs untuk mengetahui volume groups
[root@localhost ~]# vgs
 VG #PV #LV #SN Attr VSize VFree
 centos 1 3 0 wz--n- <199,00g 4,00m
oke, disitu nama volume groupnya centos
kemudian, ketik lsblk, untuk mengetahui letak dan nama disknya yang baru
[root@localhost ~]# lsblk
NAME MAJ:MIN RM SIZE RO TYPE MOUNTPOINT
sda 8:0 0 2T 0 disk
├─sda1 8:1 0 1G 0 part /boot
├─sda2 8:2 0 199G 0 part
│ ├─centos-root 253:0 0 50G 0 lvm /
│ ├─centos-swap 253:1 0 7,9G 0 lvm [SWAP]
│ └─centos-home 253:2 0 141,1G 0 lvm /home
└─sda3 8:3 0 1,8T 0 part
sr0 11:0 1 1024M 0 rom
sda3 adalah nama disk yang baru itu. lalu, kita tambahkan disk yang baru itu pada volume group centos dengan perintah :
[root@localhost ~]# vgextend centos /dev/sda3
 Volume group "centos" successfully extended
lanjut, kita lihat dulu, apakah command diatas berhasil, yaitu volume goups sudah tertambah :
[root@localhost ~]# vgdisplay centos | grep Free
 Free PE / Size 473088 / 1,80 TiB
sudah tertambah ya, jadi 1.8 TB. lanjut , kita extend, nah disini bebas, mau extend full, atau beberapa sesuai kebutuhan, dan juga, yang di extend sesuai mount point, ya istilahnya bagi-bagi kuelah. ada beberapa mount point pada volujme group, khususnya centos, ada root,swap, dan home disini saya akan extend yang root saja dengan menambahkan 500GB dari 1.8 TB. untuk extend full
lvextend -l 100%FREE /dev/centos/root
[root@localhost ~]# lvextend -L+500G /dev/centos/root
 Size of logical volume centos/root changed from 50,00 GiB (12800 extents) to 550,00 GiB (140800 extents).
 Logical volume centos/root successfully resized.
setelah di tambahkan, tinggal proses sync meta data dengan perintah growfs
[root@localhost ~]# xfs_growfs /dev/centos/root
meta-data=/dev/mapper/centos-root isize=512 agcount=4, agsize=3276800 blks
 = sectsz=512 attr=2, projid32bit=1
 = crc=1 finobt=0 spinodes=0
data = bsize=4096 blocks=13107200, imaxpct=25
 = sunit=0 swidth=0 blks
naming =version 2 bsize=4096 ascii-ci=0 ftype=1
log =internal bsize=4096 blocks=6400, version=2
 = sectsz=512 sunit=0 blks, lazy-count=1
realtime =none extsz=4096 blocks=0, rtextents=0
data blocks changed from 13107200 to 144179200
kemudian lihat, apakah sudah tertambah
[root@localhost ~]# df -h
Filesystem Size Used Avail Use% Mounted on
devtmpfs 3,9G 0 3,9G 0% /dev
tmpfs 3,9G 0 3,9G 0% /dev/shm
tmpfs 3,9G 8,8M 3,9G 1% /run
tmpfs 3,9G 0 3,9G 0% /sys/fs/cgroup
/dev/mapper/centos-root 550G 50G 501G 10% /
/dev/sda1 1014M 194M 821M 20% /boot
/dev/mapper/centos-home 142G 109G 33G 77% /home
tmpfs 783M 0 783M 0% /run/user/0


